
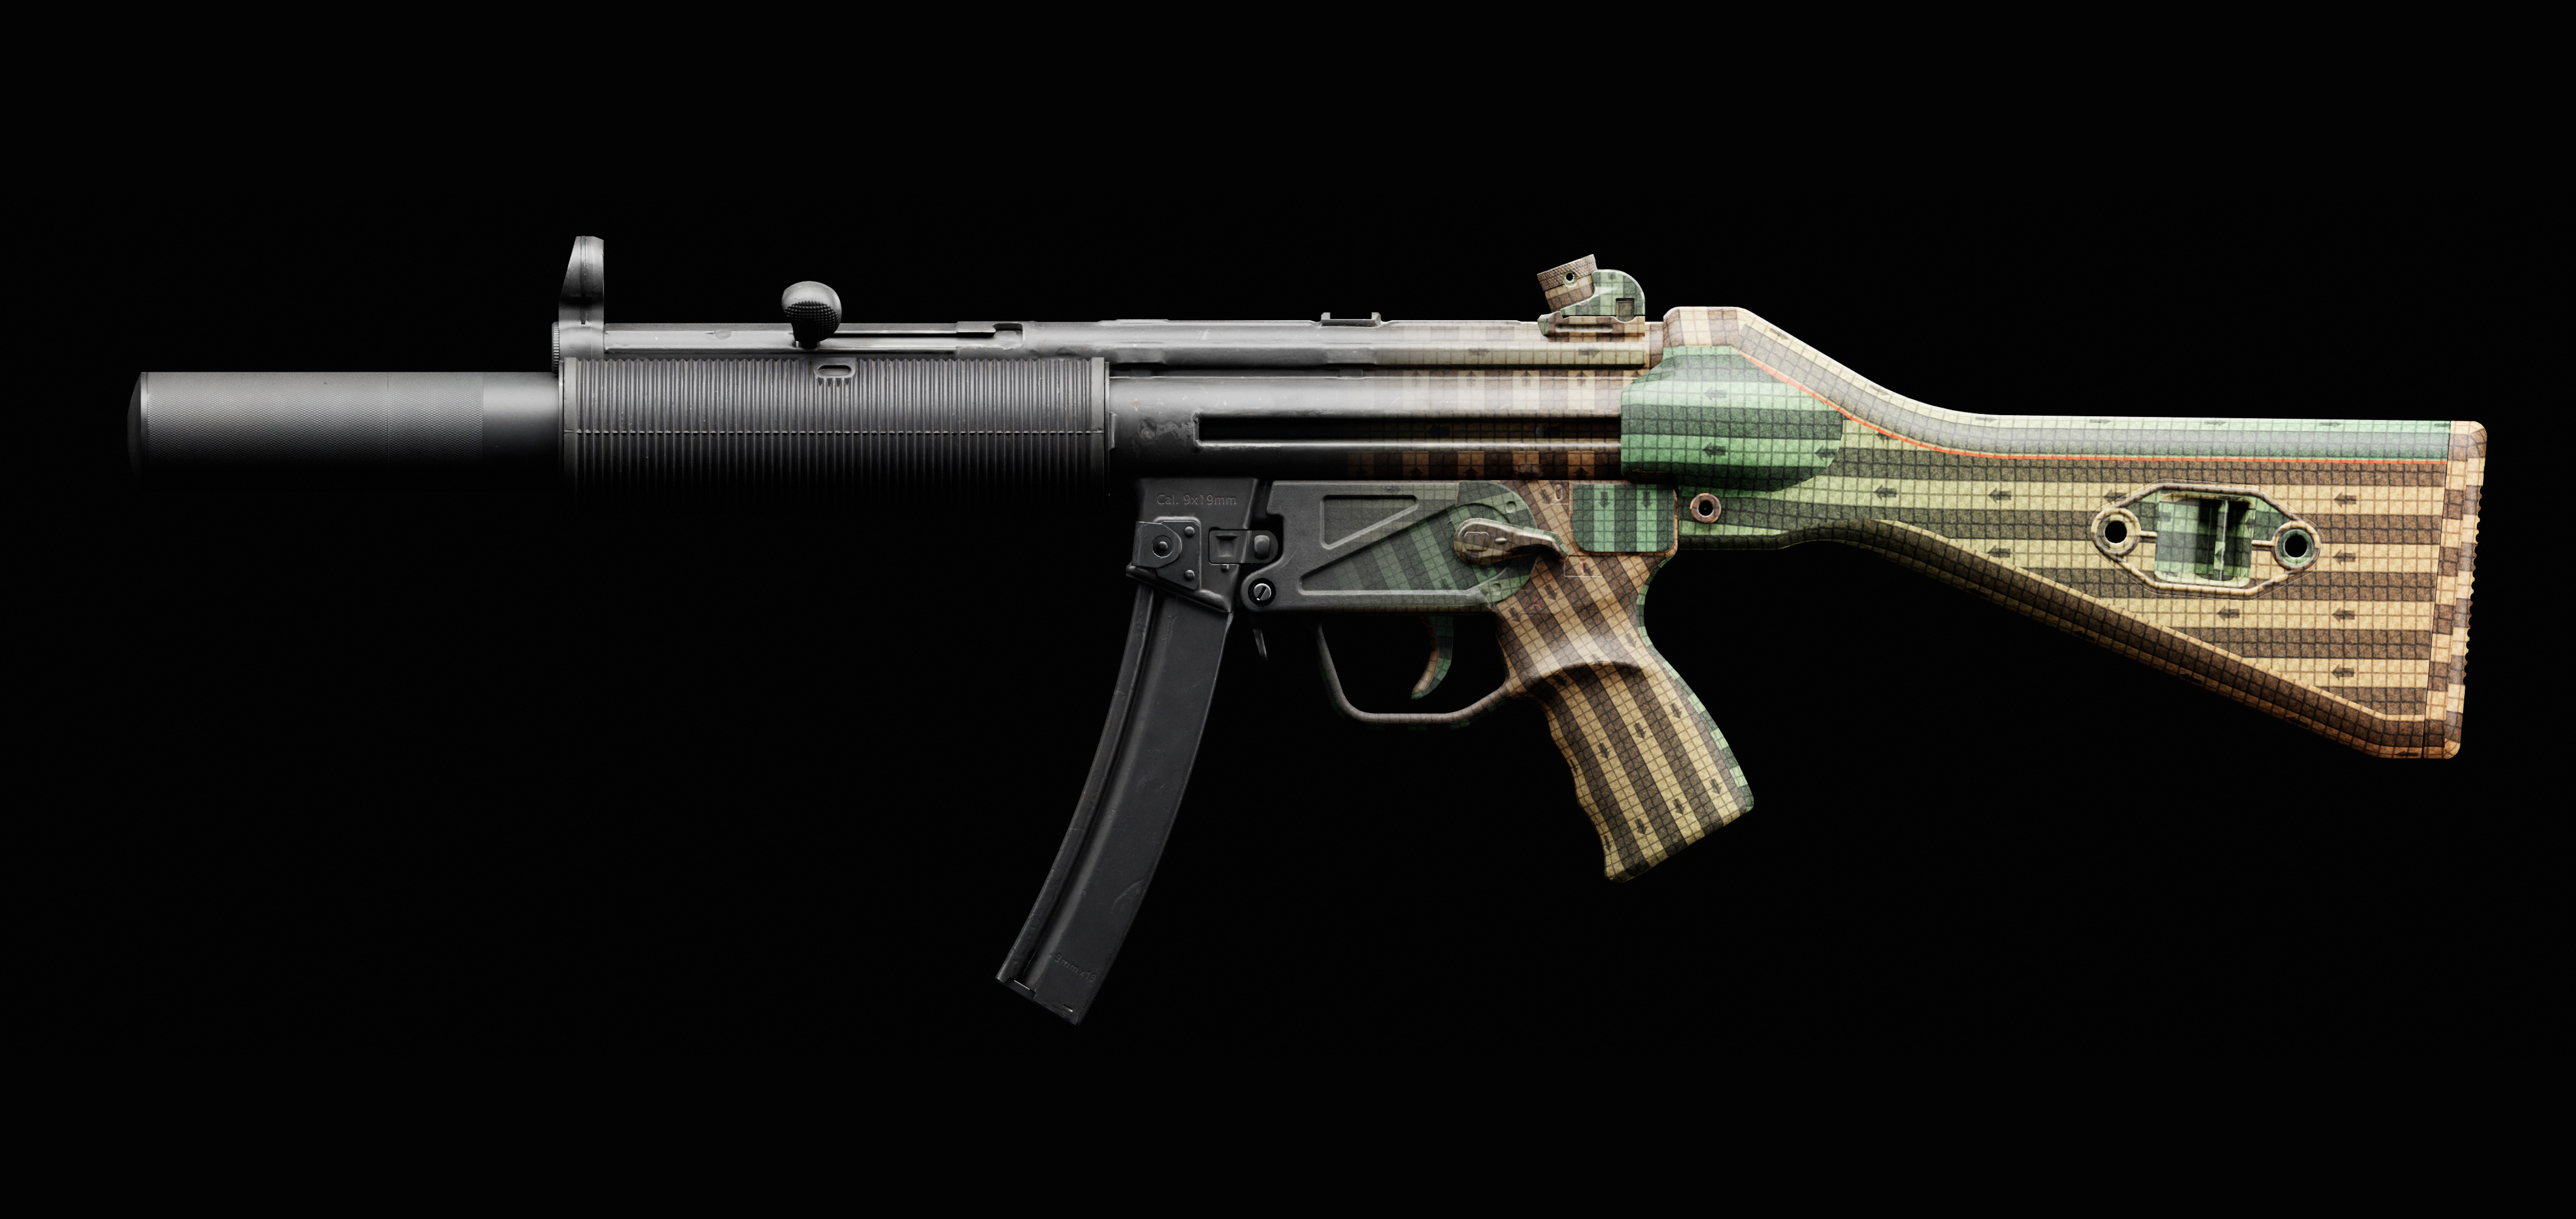
UV Mapping
UV mapping is straightforward but directly affects shading, texture clarity, baking stability, and runtime performance. The job is to place seams where the bake needs them and distribute texture space according to the asset’s viewing distance and importance.
UV mapping is one of the most straightforward stages of asset production, but it is also one of the most monotonous. At the same time, it has a direct impact on shading quality, texture clarity, baking stability, and runtime performance.
At this stage, we define where UV shells should be split, how the texture space should be distributed, and how efficiently the asset will use its texture budget.
UV Seams and Shading
Every hard edge should be a UV edge, but not every UV edge has to be hard. Split shells where normal direction or baking requires it, while avoiding unnecessary hard edges and vertex duplication.
A useful rule for hard-surface assets is:
Every hard edge should be a UV edge, but not every UV edge has to be a hard edge.
Hard edges usually require UV splits because the normal direction changes sharply and needs to be represented correctly in the bake. If this is not handled properly, the asset may produce visible shading gradients, compression artifacts, or distorted normal map behavior.
However, the reverse is not always true. A UV seam does not always need to become a hard edge. For smooth or flat surfaces, it can be more efficient to keep the shading smooth across a UV split when there is no visual reason to harden the edge. This helps reduce unnecessary vertex duplication and keeps the mesh cleaner from a runtime perspective.
The goal is to separate UV shells where the bake and shading require it, not simply to cut the asset everywhere.
UVs Exist for Textures
UVs exist to support the texture budget. Hero weapons in VR need consistent sharpness because the player can bring them close, rotate them freely, and inspect surfaces from unusual angles.
UVs are not created in isolation. They exist to support textures.
This means that UV layout should always be planned around the texture budget, expected viewing distance, asset priority, and required pixel density.
For hero weapons in VR, this is especially important. The player can bring the weapon close to their eyes, rotate it, and inspect surfaces from angles that would rarely matter in a traditional flatscreen FPS. Poor UV planning immediately leads to visible texture stretching, inconsistent sharpness, or areas that look softer than they should.
Pixel Density / Texel Density
Texel density keeps texture resolution consistent across an asset. The practical target is high enough to avoid visible softness at the intended viewing distance, without assigning more texture detail than the display and memory budget can use.
Pixel density, often referred to as texel density, is a measurement used to keep texture resolution consistent across an asset or across multiple assets in a scene.
In simple terms, it helps determine how much texture resolution is assigned to a certain amount of visible surface area in 3D space.
By knowing the target hardware, display resolution, expected viewing distance, and available video memory, the team can define a practical compromise between texture quality and performance.
The basic idea is simple:
The texture density on a 3D object should be high enough that the player does not notice texture softness at the intended viewing distance.
In simple terms, you need to calculate so that the pixel density of the texture on a 3D object does not exceed the pixel density of the monitor. If more than one texture pixel maps to two or more display pixels, then you will start to see “muddy” textures.
Target Density for Direct Action
Direct Action targets both high-resolution VR and a possible native 4K flatscreen version. Hero weapons and characters use approximately 47 px/cm for 4K flatscreen and 24 px/cm for VR as practical reference targets.
Although Direct Action was initially planned as a VR product for high-resolution headsets - such as Meta Quest 3, Valve Index, Sony PSVR2, Steam Frame, HTC Vive Pro 2, and similar devices, the long-term release plan also considered a potential flatscreen version.
Because of that, the texture strategy had to support not only VR, but also a possible native 4K flatscreen experience.
For weapons and hero character assets, we defined the following target ranges:
- Flatscreen / 4K target: around 120 pixels per inch, or approximately 47 pixels per centimeter
- VR target: around 60 pixels per inch, or approximately 24 pixels per centimeter
This gave us enough resolution to avoid texture softness on 4K displays for FPV view while still maintaining a practical and efficient target for high-end VR devices.
The final value can always vary depending on the asset, but having a clear density target helps the team make consistent decisions during UV layout, texture planning, and optimization.
UV Tools and Required Features
Useful UV tools automate angle-based seams, cylindrical unwraps, matching shells, packing, density normalization, pixel alignment, and orientation. Automation accelerates the first pass, but artists still need to validate the result.
There are many tools available for UV creation. Some are built directly into DCC packages, while others exist as specialized standalone applications or plugins.
Regardless of the tool, several features are especially useful for efficient UV work:
- Automatic UV seam generation based on polygon angle
- Automatic cylinder unwrapping into clean rectangular shells
- Detection and matching of similar UV shells
- Reliable automatic packing
- Texel density normalization
- Pixel alignment tools
- Shell orientation control
For example, automatic seam creation based on angle can quickly split surfaces where the angle between polygons exceeds a defined threshold, such as 60 degrees. This can significantly speed up the first pass of UV preparation, especially on complex hard-surface assets.
Automatic Packing
Modern packing algorithms save substantial time on assets with many shells, but they still need art direction. Artists must validate shell orientation, important surfaces, overlaps, padding, and density priorities.
Automatic UV packing has improved significantly over the last several years. Modern packing algorithms can solve a large part of the layout process, especially for assets with a high number of shells.
For complex weapon assets, this can save a lot of production time.
However, automatic packing should not be treated as a completely hands-off solution. The artist still needs to guide the layout and validate shell orientation.
UV Padding
Padding prevents neighboring UV islands from bleeding during filtering, compression, and mipmapping. Scale it with texture resolution: 2 px at 256, 4 px at 512, 8 px at 1K, 16 px at 2K, and 32 px at 4K.
After defining the texture size, it is important to account for UV padding - the empty pixel space between UV shells.
Padding prevents texture pixels from bleeding into neighboring UV islands during filtering, compression, and mipmapping. Without enough padding, colors, normal map data, or material information from one shell can leak into another, creating visible seams.
A simple practical rule is to scale padding with texture resolution:
| Texture size | Recommended padding |
|---|---|
| 256 px | 2 px |
| 512 px | 4 px |
| 1024 px | 8 px |
| 2048 px | 16 px |
| 4096 px | 32 px |
This keeps the relative padding consistent across texture sizes. For hero assets, especially in VR, it is safer to avoid aggressive packing that leaves shells too close to each other.
Shell Orientation and Pixel Alignment
Consistent shell direction keeps brushed metal, machined surfaces, carbon, and cloth predictable. Aligning mechanical borders to the pixel grid also reduces bleeding, shimmering, and unstable UV seams.
Whenever possible, UV shells should maintain a consistent direction in UV space.
For example, if several surfaces point upward in 3D space, it is often better for their UV shells to follow the same general orientation. When neighboring shells are rotated in completely different directions, it can sometimes create inconsistencies in normal shading.
Also, consistent UV orientation helps textures behave more predictably and simplifies the setup of tileable materials such as brushed metal, machined surfaces, carbon, cloth, and similar materials.
Pixel alignment is another useful technique, especially for hard-surface assets with clean mechanical edges.
When UV shell borders align cleanly to the pixel grid, the texture can produce sharper and more stable edges. This helps reduce bleeding, shimmering, and unwanted artifacts around UV seams.
Overlaps and Reduced Texel Density
Repeated, mirrored, hidden, internal, or low-visibility parts can share UV space or use lower density. The goal is not equal cost everywhere, but consistent quality where the player can actually inspect the weapon.
There is nothing wrong with using UV overlaps when the asset allows it.
Repeated screws, mirrored elements, hidden parts, internal components, or low-visibility details can often share UV space. This saves texture memory and allows more resolution to be spent on the areas that matter most.
The same applies to texel density. Not every part of the asset needs the same resolution. Areas that are rarely visible, hidden inside the weapon, covered by other parts, or seen only from a distance can use lower density.
However, for VR weapons, the visible side of the asset should remain as consistent as possible. Because the player can inspect the weapon closely, sudden changes in texture density can become noticeable very quickly.
The goal is not to make every surface equally expensive. The goal is to spend texture resolution where the player will actually see and feel the difference.
Production Principle
UV mapping is an allocation problem: split only where shading and baking require it, then spend texture space where the player will notice the difference.
A production-ready UV layout balances shading stability, consistent texel density, safe padding, predictable orientation, and efficient reuse. The most visible and interactive surfaces receive the texture budget; hidden or repeated surfaces support that priority instead of competing with it.